Direct To Garment printing should be easy, right? Just load the graphic, the shirt, and press the PRINT button. But anyone who has ever done DTG printing knows that there is a LOT more to it than just that. Even though there are a lot of moving parameters in DTG printing, they can be overcome and tamed. You just need to have a little knowledge working on your side to tame the DTG beast.
It seems that 80% of all DTG printing problems relate back to improper pretreatment, or preparation, of the shirt prior to printing. Pretreating is the “foundation” of your DTG house. A poor pretreating job results in a poor print. But, what kind of impact does the foundation of your pretreatment job, the actual T-Shirt itself, do to your DTG print?
To explore this a little further, we utilized a new Wedge Step Test developed for the Viper MAXX pretreatment machine, but this can easily be recreated on many of the pretreatment machines on the market. The Wedge Step Test allows you to print an image across a wide range of pretreatment applications. Think of it as several columns of pretreatment across the shirt. But each individual column is set to a differing amount of pretreatment. You might start at 10 grams on the left and increase it by 5 grams in each column. The far right column of pretreatment might end up being 35 grams.
This is exactly what we did with our Viper MAXX and Image Armor pretreatments.
WHAT DOES THIS ALLOW?
This allows us to take a finished shirt that we want to print on and explore how differing levels of pretreatments and different print settings react with the pretreatment applied to the shirt. This means we can find the MOST optimal amount of pretreatment for our pretreat used, the shirt, and ink sets for that particular DTG printer. By analyzing a white block that is printed horizontally across the pretreated Wedge Steps, we can see how the opacity increases. The more pretreatment at a particular ink setting being printed should get more opaque (more white) as it is printed on increasingly more pretreatment. At some point there will be NO increase in opacity between a Wedge Step. This would then indicate the optimal amount of pretreatment for that shirt for that particular pretreatment and DTG printer ink settings.
DO DIFFERENT SHIRTS REALLY AFFECT OUR DTG PRINTS?
We decided to duplicate the Wedge Step Test on 3 different shirts. In this article we are not going to name the specific shirts, but we labeled them Shirt 1, Shirt 2 and Shirt 3. We pretreated each shirt with our Wedge Step Test document on the Viper MAXX (making this test super easy) and then printed on an Epson F2000 a white bar at the default LEVEL 2 setting for white ink and then the maxed out LEVEL 3 white (all without any additional white ink deposited).
Our conclusion is this: YES, THE SHIRT PLAYS A HUGE ROLE IN HOW YOUR DTG PRINTS WILL LOOK.
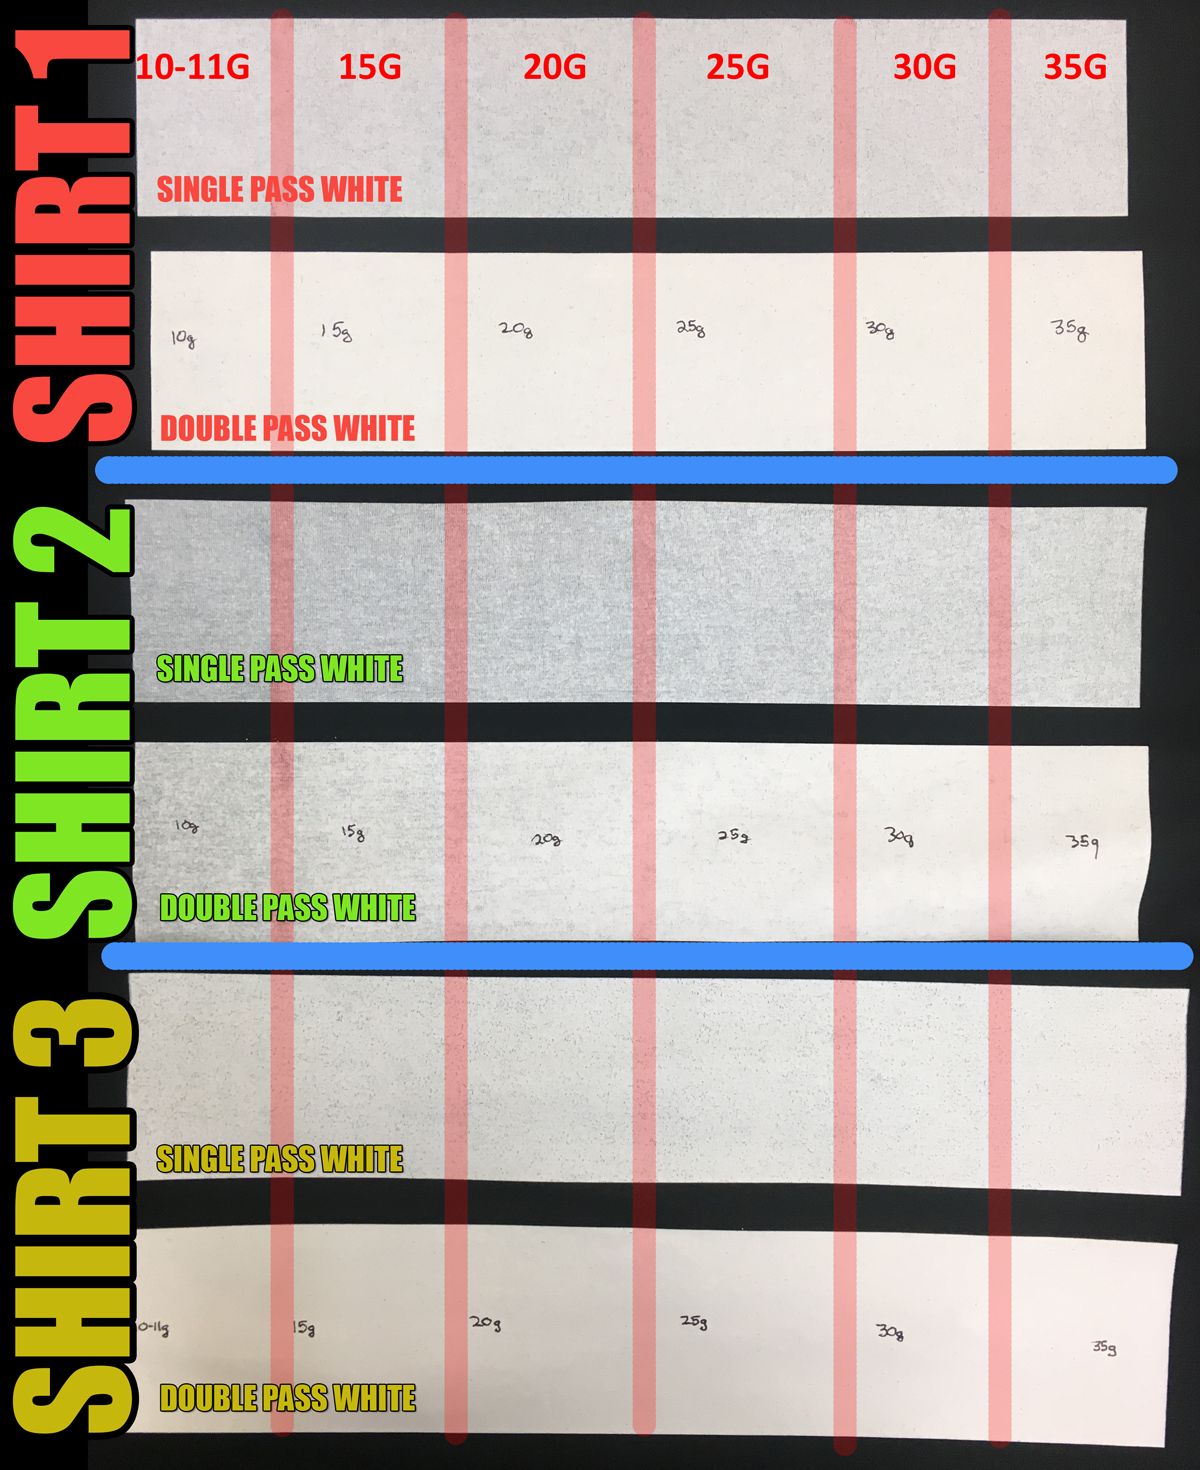
You could say that this was already commonly known. But let’s take a look at our graphic showing all 3 shirts and the WEDGE STEP TEST with the white bar printed across it. Remember that all factors EXCEPT THE SHIRT were exactly the same. (Clicking on the image above will bring up the full resolution of the image so you can more easily see the differences in pretreatment used).
Please note that on the F2000 the LEVEL 2 was the SINGLE PASS white and the LEVEL 3 was a DOUBLE PASS white.
With all parameters being the same, you can see the varying amounts of pretreatment from 10-11g on the far left and increasing by 5 grams until we hit 35 grams (for a 14″x14″ area) on the right side of the shirt. There is an OBVIOUS difference in how the white looks on the shirts.
First, a single pass of white will not look nearly as well as a double pass of white. However, printing both a single pass and double pass side by side like this allows us to see varying differences and qualities that allow us to select which pretreatment amount and ink settings will yield us the best print FOR A PARTICULAR SHIRT STYLE and COLOR.
It can be seen in our initial print test that there was a HUGE variance in the quality of the white box printed. The worst SHIRT required almost 30-35 grams on the double pass white to look great. The best shirt was somewhere in the 10-15 gram range. This means on the best shirt, SHIRT 3, that any pretreatment application above 15 grams would have been a waste of material.
 THE CONCLUSION
The basic conclusion of this test opened many more questions, but revealed one thing. It is that the brand and style of shirt can play a HUGE impact on the final product that you produce. The better shirt was able to get a fantastic print with just 10-15 grams of pretreatment applied (SHIRT 3). The worst of the three shirts required 30-35 grams of pretreatment and still did not give as good a final print (SHIRT 2). This means we would either need to increase the pretreatment amount even more, potentially making the shirt even stiffer than normal and opening the doors to serious discoloration or burning of the shirt, and/or increase the amount of ink applied to achieve the same look as the best print by SHIRT 3.
This basically means that you might save some money on a cheaper shirt, but you will end up spending more on ink and pretreatment to make the print look better. Less ink, less pretreatment means a softer looking shirt that costs you less BUT still looks great. The interesting thing here was that SHIRT 2, the worst of our three shirts tested, was NOT a cheaper shirt, which we found extremely interesting.
Knowing the results from this test equals more money in your pocket – and hopefully more repeat business from happy customers.