 To help people understand some of the variables with different pretreatment and ink curing options, we wanted to do a side-by-side comparison to show what happens with the Image Armor E-SERIES™ DTG Inks and pretreatments. All the printing parameters and pretreatment application settings were the same for each print. The only difference was how the pretreatment and inks were cured – either with pressure and contact or using a hover with “no contact”.
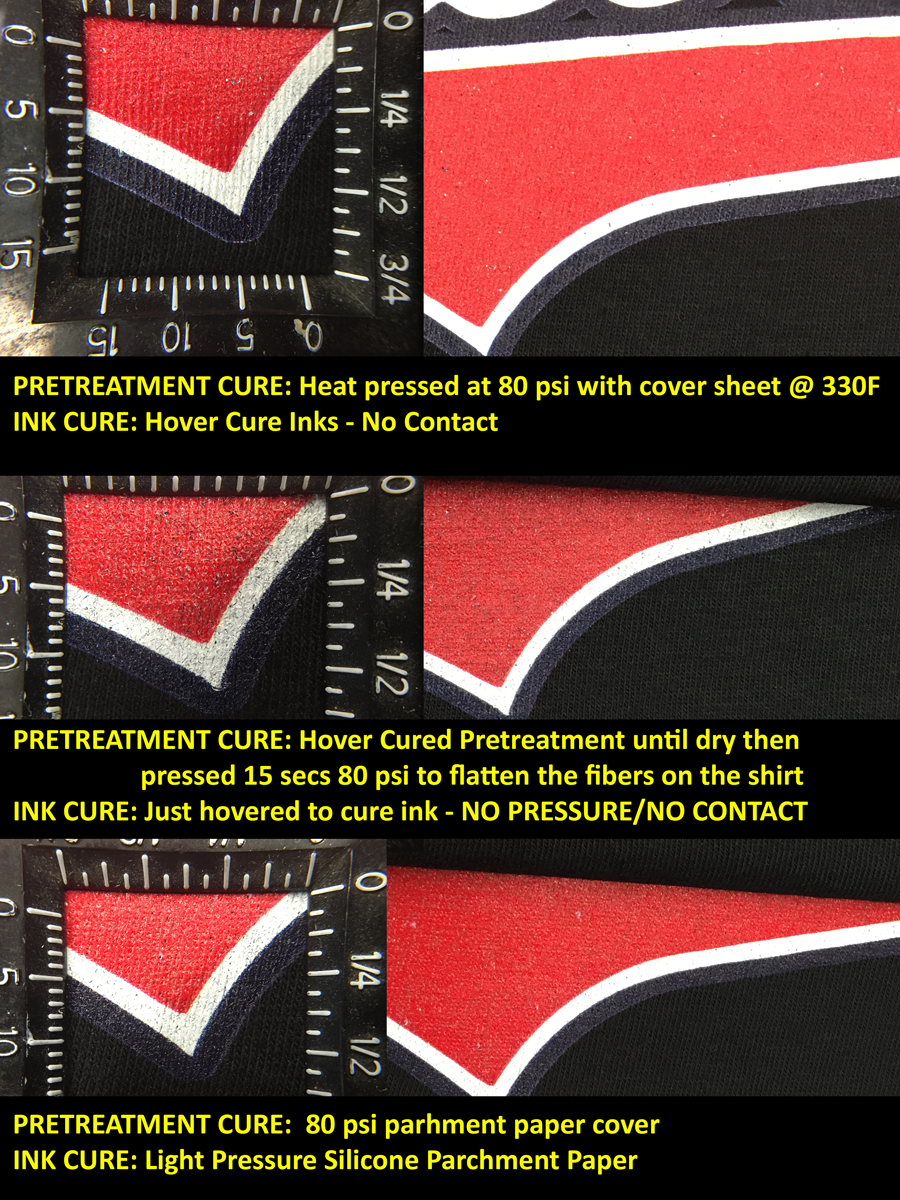
In the image to the left we we show three different pretreating and ink curing scenarios.
The TOP:
The top process in our picture is as follows:
- Pretreatment Cure: 80 psi heat press cure with parchment paper while PT is wet.
- Ink Cure: Hover cure ink with no contact with the ink surface.
Results Observed: Because we were able to press the pretreatment while wet, we were able to trap the fibers so they were flatter against the shirt. This allowed for a nice smooth white ink layer. The reds were still very bright and visibly appears to be the brightest red of the three procedures. The surface of the CMYK/White ink had much more of a screen printed look and feel – i.e. it was “textured”. The surface texture was a little rougher due to no pressure from the heat press smoothing out the ink film. Plus, if you look at the close-up you can see the weave of the shirt in the DTG ink film thus giving it the look of the screen mesh in the ink film just as you would get with a good, high-end screen print.
The MIDDLE:
The middle process in our picture is as follows:
- Pretreatment Cure: Hover “dried” the wet pretreatment and THEN used the heat press @ 80 psi for 15 seconds to flatten fibers of the shirt prior to printing.
- Ink Cure: Hover cure ink with no contact with the ink surface.
Results Observed: Due to the fact that we did not “trap” the shirt fibers down (laying flat on the shirt) while they were wet, this print results in a much higher degree of loose fibers and a much higher/rougher surface for the white ink and color print. The white ink was not nearly as bright optically but was still very good (a result of a rougher printing surface for the white ink). The colors, especially the red was not as bright due to the fact that the white ink soaked into the shirt a little bit more (more loose fibers) and so not as smooth as a printing surface. The over all hand and feel of the print was the roughest of all three prints, which some might find attractive for a finished print.
The BOTTOM:
The bottom process in our picture is as follows:
- Pretreatment Cure: Used the heat press @ 80 psi for 15 seconds to flatten fibers of the shirt prior to printing – repeated twice to ensure it was totally dry.
- Ink Cure: Parchment paper – light pressure cured 35 seconds @ 356F.
Results Observed: Because we pressed the pretreatment while wet, this gave us the smoothest printing surface as the wet pretreatment was cured and thus trapping the fibers “flat” on the garment. In addition, the final DTG print was heat pressed with light pressure and a cover sheet thus smoothing the entire ink film. Though the pressure of the ink slightly pressed the CMYK ink into the white ink film, the difference is barely visibly in comparison to the TOP version where the ink film was just hover cured – though still very bight and intense as far as the red is concerned. This process resulted in the smoothest feeling print on the shirt. Some would say it would look or feel more like a transfer due to the sheer smoothness of the finished ink film print.
OVERALL OBSERVATIONS:
What can we say? It depends on what effect you are trying to achieve on your final DTG print. I would consider the best looking and feeling print the TOP version with the pretreatment pressed but the ink layer hover cured. This is obviously a personal opinion. The issue with this process is the cure time on a heat press. The time will be MUCH longer than actually doing the 35 second cure by touching the heat press platen onto the ink film and using slight pressure (resulting in a smoother surface but a true 35 second cure time). You’d have to do multiple tests to find the right time and temperature to ensure a complete cure of the inks to ensure maximum wash durability.
You might want to try a couple variations on this to see what you like best. Running the shirt down a conveyor dryer to cure the ink would be the most optimal as far as “production” is concerned, however most DTG printers do not have the space or equipment to cure in this fashion. This process though provides the best facsimile of a screen printed shirt, but using a dryer you will definitely need to ensure the entire ink film is cured (not over baked) and wash tests to confirm the best, optimal settings to ensure a durable print. Due to the many variables we can not give much in terms of guidance other than the fact that you’d have to do a fair number of tests with different times and temperatures to find the magic combination for your equipment.
Many users will still find that using the heat press to cure the pretreatment and ink with the “on contact” method will still be the fastest and most secure way to ensure a smooth, bright print that is properly cured in 35 seconds.
So, don’t be afraid to experiment a little and expand your knowledge base with your printer and inks. You might find something you and your customers like better and it will give you a better understanding of your entire DTG process.